Day 2: SSL Certificates, LAN/WAN access
Yesterday we started with our first server installation. As part of that installation, we created and configuration certificates. Today we will look at this step in more detail. You should also have a look at the online help section about SSL certificates. First of all, we will discuss why we need certificates.
Why do I need certificates?
Digital certificates are necessary to secure encryption between server and clients. Certificates allow client computers to verify that they are communicating with the expected server. This is done by signing a server certificate by a certification authority (CA). As long as a client computer trusts that CA, it also trusts all certificates signed by that CA. That’s a chain of trust with the CA certificate on top (the root certificate).
If a client starts a connection, the server presents his certificate to the client. The client verifies the correct server domain name and the CA which signed that server certificate. If the client trusts the CA, consequently the client trusts the server.
Certification authorities are usually companies that charge money if they issue certificates. Such a purchased certificate has one advantage. Most operating systems and browsers already know and trust the CA (root) certificate of that company. Therefore you do not have to change anything on a client computer.
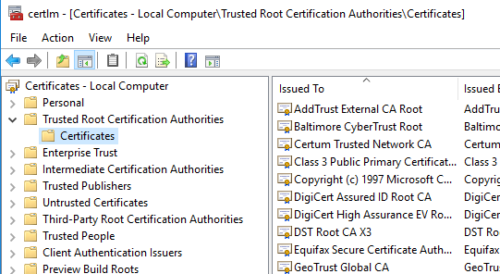
The certificates store keeps CA certificates in the “Trusted Root Certification Authorities” section:

Self signed certificates
Yesterday we decided to create our own certificates. As a result of that process, the SSL Wizard of Lights-Out created two certificates for your server:
- A root (CA) certificate. This is used to sign other certificates and only this certificate is required and installed on the client. The name of a root certificate is Lights-Out-<your server name>-CA. It is stored under “Trusted Root Certification Authorities”.
- A server certificate used to ensure the server identity. This certificate is given to the client. The name of a server certificate is <your-server-name>. It is issued by our CA and store in the “Personal” folder.
A sample looks like this:


This certificate ensures the identity of a server called S2016. There is a chain of trust starting with the Lights-Out root (CA) certificate.
The SSL Wizard supports an extension called “Subject Alternative Name“. This allows us to add a second domain name into the same certificate.
You can use that feature to add your external dynamic DNS name! Do this during installation or later on. Start the SSL Wizard and enter you DDNS name here:

In your sample, we use the NO-IP name s2016.hopto.org. As a result, the wizard creates a server certificate with both names. The short NETBIOS name called S2016 and a second entry with your external domain name. This can be used to access Lights-Out from mobile equipment (notebooks, mobile phones) over the internet (WAN access) with full secure encryption.

Using existing certificates
If you already have a valid certificate, you probably purchased it from a public certification authority. Or you have one from an organization like Let’s Encrypt. Or your company runs a private CA. In any case, you can use the SSL Wizard to assign such a certificate. This is also true for users of Windows Server Essentials or Home Server. If they configure remote web access, they also have a valid Go Daddy certificate for the external name.
To make use of such a server certificate, first of all, verify that the certificate is stored under Local Computer – Personal in the certificate store. Otherwise import the certificate into that folder.
Finally run the SSL Wizard. Select to use existing certificates. Use the internal certificate for the short NETBIOS name on port 7783. Choose your external certificate for port 7784. More on the used ports can be found in the online help.

You can see the external Go Daddy certificate on this Windows Server 2016 Essentials.
Summary
This will close our introduction into certificates for now. We will look again at that topic in a later blog post when we connect our mobile equipment to Lights-Out. If you want to access Lights-Out from outside, be sure to read the online manual in the meantime.
Here you will find the complete list of all days of our step-by-step series.


January 5, 2017 @ 12:28 am
The self created certs seem to work fine in IE and Edge, but why doesn’t it work in Chrome? I get a warning that my connection is not secure.
January 5, 2017 @ 6:18 pm
Hi Frank, where do you see the warning in Chrome? On a client computer? If the client is not yet connected, then the Root-CA is missing and you see a warning if you use SSL. Otherwise it should work with Chrome also.